Cart 0
Do you want to disable lazy loading in WordPress? WordPress by default has a lazy load function, which delays picture and other media downloads to enhance page load time. However, not displaying graphics immediately may have an impact on the user experience for some websites. In this article, we will demonstrate how to simply stop lazy loading in WordPress.
What Is Lazy Loading?
WordPress added slow-loading images with version 5.5. It later expanded the lazy load feature to include iframe embeds (such as YouTube videos, Spotify, and others). This strategy improves your site’s performance and page speed by loading content and visible areas first.
A quicker website is not only beneficial to users, but it can also boost your website’s ranks, as search engines such as Google view speed as a significant ranking element. Aside from photos and embeds, you may easily lazily load comments and Gravatars to boost page load performance.
To view the lazy loading functionality in action, right-click on an image and select the Inspect tool from your browser. In other cases, you may be using an alternative lazy loading solution and simply want to disable the default WordPress lazy load. That being said, here’s how to simply disable lazy load in WordPress.
This lesson will cover both a coding method and a plugin method, so use the links below to jump to the method of your choice:
Disable Lazy Load in WordPress Using WPCode
To disable the lazy load functionality in WordPress, just add custom code to your theme’s functions.php file. However, take in mind that even the smallest error when inserting the code can destroy your website and render it inaccessible. This is why we propose that you use WPCode to add custom code to your website.
It is the greatest WordPress custom code snippets plugin on the market, making it incredibly simple to add custom code. First, install and activate the WPCode plugin. For more information, visit our tutorial on how to install WordPress plugins.
Once activated, go to the Code Snippets » + Add Snippet page from the WordPress dashboard.
Click the ‘Use Snippet‘ button below the ‘Add Your Custom Code (New Snippet)‘ option.

This takes you to the ‘Create Custom Snippet‘ screen, where you can begin by entering a name for your code snippet. This might be anything that helps you identify the code snippet and what it performs.
Next, choose ‘PHP Snippet‘ from the ‘Code Type‘ dropdown menu in the right corner of the screen.
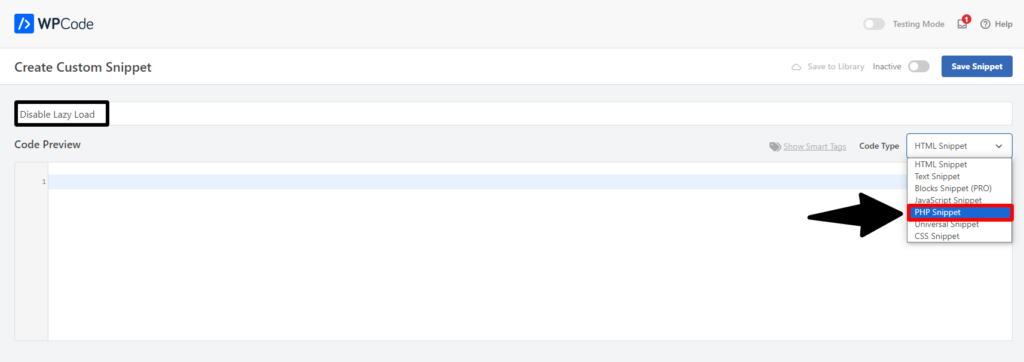
Now, copy the following PHP code into the ‘Code Preview’ box:
add_filter( 'wp_lazy_loading_enabled', '__return_false' );This is how the code looks after being pasted.

Next, scroll down to the ‘Insertion‘ section. Simply select ‘Auto Insert‘ mode.
Once you activate the snippet, your custom code will be executed automatically across your WordPress site.

Next, go to the top of the page and toggle the ‘Inactive’ switch to ‘Active‘.
After that, remember to click the ‘Save Snippet‘ button to save and run your code snippet.

Read More Relevant Articles
- How to Easily Add Custom Code in WordPress
- 10+ Most Popular Digital Products Can Sell Online in 2024
- 10+ Best WordPress Themes for SEO Experts in 2024
- How to Do Keyword Research for Your WordPress Blog
- 10 Best Lead Generation Plugins for WordPress in 2024
- 7 Best WordPress Redirect Plugins
- 6 Best User Feedback Plugins for WordPress
- 7 Best WordPress Chat Plugins
- 5 Best Plagiarism Checker Tools for Your Site
- 5 Best WordPress Plugins to Duplicate Site
The Final Conclusion
In conclusion, disabling lazy load in WordPress can be essential for optimizing website performance, particularly when encountering compatibility issues with certain themes, plugins, or content types. By following the steps outlined above, you can effectively deactivate lazy loading functionality and ensure that your website’s images and content load promptly and efficiently for all users. Remember to regularly monitor your site’s performance to maintain an optimal user experience and make adjustments as needed.

